How to Make a Book (and let go of your perfectionism along the way)
- cujeart
- Sep 16, 2025
- 4 min read
Updated: Oct 23, 2025

If you're reading this, you're either my wonderful AVT595 Professor (hi Professor Silva!) or my classmate. Either way, you're most likely a perfectionist. As artists, we strive to make amazing work. Unfortunately, making a lot of amazing work requires making a lot of sh**** work too.
That's the secret.
I think creating my own book was an ideal exercise in managing perfectionism by taking on the challenge of a new medium. Making a journal or book requires precision, but how precise can we be as novice bookbinders? I folded my pages as perfectly as I could, but some of them didn't line up. I followed directions to correctly align my hardcover, but still had to scrap my first attempt and restart. Each time I made a mistake, my book gained more character. This is the marrow of creativity: trying new things, sucking at them, then trying again.
I'm going to show you how to make your own perfectly unique, but ultimately imperfect book. By the end of this process, you'll have acquired a new skill and, hopefully, released a bit of that paralyzing perfectionism.
Step 1: Gather your materials.
You will need the following materials:
12 sheets of letter-sized paper (whatever color/styles you'd like)
Piece of graph paper
A 12in. cardboard "hardcover"
Waxed linen thread (whatever color you'd like)
Sharpie
A small binder clip
Scissors
Bone folder
Awl
Ruler

Step 2: Fold your papers.
Grab your 12 sheets of paper and your bone folder
Use the bone folder to carefully fold each piece of paper in half horizontally (hamburger-style)

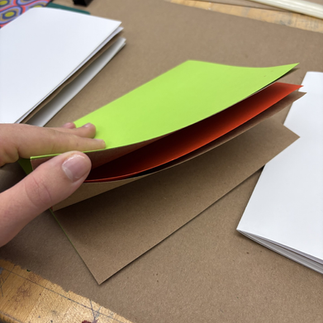
Step 3: Organize your signatures.
Your signatures are different sections in your sketchbook. You can organize them however you'd like!
Categorize your folded paper into 3 groups with 4 sheets each
There should be 8 "pages" in each folded signature


Step 4: Create your template.
Grab your small piece of graph paper
Fold it in half vertically (hamburger-style)
Fold both halves into the middle so you end up when 3 creases when laid flat
Carefully, fold your paper in half longways (hotdog-style)
Open your graph paper up. Find the intersections of the folded lines and mark a circle on each point with your sharpie
You should have 3 dots

Step 5: Prep signatures for stitching.
Lay the graph paper template inside the middle of one of your signatures
Holding it away from you, carefully use the awl to poke through the template and paper signature

Repeat with all 3 signatures
When you're done, all 3 of your signatures should have 3 identically-spaced holes poked through the middle of the "spines"

Step 6: Create your hardcover.
Grab your 12in. cardboard piece, graph paper template, sharpie, binder clip, ruler, and bone folder

Find the center of the cardboard by measuring 7in. from the left side. Mark with sharpie
Flip your hardcover upside down. Now measure 7in. from the right side. Mark with sharpie
Where each of your sharpie marks are, draw a straight line from the top of the cardboard to the bottom
You should have two lines marking the middle of your hardcover. This will be your sketchbook spine!
Grab your ruler. Lay it flat alongside the left line you drew. Begin gently folding the left side of the cardboard along the ruler, using the bone folder to encourage the fold

Repeat this step with the right side of the hardcover

Step 8: Prep hardcover for stitching.
Grab your graph paper template
Fold each of the edges in towards the middle of the paper longways (hotdog-style)

You will have new intersections. Mark these with your sharpie
You will have 3 rows of 3 dots in a straight horizonal line
Secure this updated template on top of the middle portion, or spine, of your hardcover with your metal binder clip

The template should line up perfectly with the height and width of your hardcover spine
Use your awl to carefully poke through the template and cardboard to create 3 rows with 3 holes in each row. There should be 9 holes total

Step 8: Organize and assemble your book.
Grab your waxed linen thread and scissors
Grab one of your signatures. You'll be using it to measure how much thread you need!
Unspool the thread on top of the signature vertically
Measure the thread to 3x the length of your signature
Do not cut the thread. It will be easier to sew this way

Now, grab all of your signatures and organize them in a way that makes you happy! Do this by stacking them in the order you wish for them to be in.
Step 9: Create your long stitch.
There are many ways to do a long stitch
Because I as absent during the class where we sewed together our sketchbooks, my long stitch is a little different
Begin by spooling your thread through your needle until your halfway through the length of thread
Tie a little knot at the end
Begin by feeding the needle and thread through the top, far left hole from the outside of the sketchbook
Ensure that you leave a small loop on the inside of the spine. You'll need the loop to tie up the signature
Push the needle through the hole so you're now inside the sketchbook
Repeat this process from the inside, to the outside and back again until your at the bottom of the 3 far left holes
From the outside of the sketchbook, feed your needle through the bottom, middle, and top loops that were created as you sewed
Double-knot the thread once you get to the top
Repeat this process with the other 2 signatures
Step 10: Make some art in your awesome new book.
Now that you have your sketchbook, begin making some amazing new art in it!


Comments